
Use one-page, system-specific checklists paired with a scored mark sheet, not a vague mental run-through. Start with templates for common systems: abdominal, respiratory, cardiovascular, focused history, neurological (upper limb), and a musculoskeletal joint exam. Each pairs with a single examiner checklist scored on a three-point scale (not completed, partial, complete). Print one template right now and run a timed eight to ten minute mock with a classmate before you read another study guide.
TL;DR:
- Using a three-point scoring system for checklists captures partial attempts and poor techniques, providing more meaningful feedback than a simple yes/no method.
- Checklists should be limited to 15-20 items, with safety items weighted double, to ensure they are practical for timed exam stations and accurately reflect critical errors.
- Repeated practice with a detailed rubric and immediate feedback, especially through digital scoring tools or AI platforms, significantly improves exam performance over random rehearsal.
- Incorporating all three exam scripts—candidate instructions, patient portrayal, and examiner checklists—is essential for reliable assessment and consistent practice.
- Customizing checklists for different specialties, difficulty levels, and scenarios ensures relevance and helps students prepare for a broad range of OSCE station types.
Table of Contents
- OSCE Checklists Examples You Can Print Today
- A Full Example Station: Abdominal Exam With Examiner Rubric
- What Candidate, Patient, and Examiner Scripts Actually Contain
- Choosing a Scoring Rubric and Building Printable Checklists
- Turning Checklists Into a Practice Routine
- Turning Checklist Practice Into Scored Simulation
- Communication and Ethics Stations Need Checklists Too
- Adapting Checklists Across Specialties and Difficulty Levels
- Common Mistakes When Building OSCE Checklists
- Using Checklists for Self-Assessment and Peer Feedback
- Digital Tools That Support Checklist-Based Practice
- The Gap Between Checklist Theory and Exam-Day Performance
- Try Scored OSCE Practice Instead of Guessing Your Readiness
- Where to Find the Original OSCE Checklists and Rubrics
- Sources
- FAQ
OSCE Checklists Examples You Can Print Today
These six mini-checklists cover the systems examiners return to most often, and each fits on a single sheet of paper. Copy the structure, swap in your own patient scenario, and you have a working station in five minutes.
Respiratory exam, 8 minutes. Goal: assess breath sounds, chest expansion, and percussion note. Opening: wash hands, introduce yourself, confirm patient identity, gain consent, expose the chest appropriately. Exam steps: inspect for scars and use of accessory muscles, palpate chest expansion at two levels, percuss anterior and posterior fields, auscultate six zones front and back, check for vocal resonance. Safety check: ask about pain before palpating. Closing: thank the patient, offer to help them re-dress, summarize findings out loud. Examiner cue for "complete": all six auscultation zones checked bilaterally, findings verbalized.
Cardiovascular exam, 8 minutes. Goal: assess heart sounds, pulses, and signs of heart failure. Opening steps match the respiratory station. Exam steps: inspect hands and face for clubbing or cyanosis, palpate radial and brachial pulses, check blood pressure technique and cuff placement, palpate the apex beat, auscultate four valve areas, check for ankle edema. Examiner cue: cuff sized and positioned correctly counts as a discrete item, per the Ohio State University physical exam checklist.
Abdominal exam, 8 minutes. Covered in full detail in the next section.
Focused history, 10 minutes. Goal: elicit a presenting complaint with SOCRATES or similar framework, past medical history, medications, allergies, and social history in the time allowed. Safety check: ask about red flags relevant to the complaint before closing.
Neurological upper limb, 10 minutes. Goal: assess tone, power, reflexes, coordination, and sensation in a structured sequence, ending with a functional task like doing up a button.
Musculoskeletal joint exam, 8 minutes. Goal: run "look, feel, move, special tests" on a single joint, checking range of motion actively and passively before any special test.
A Full Example Station: Abdominal Exam With Examiner Rubric
Here is a complete abdominal station, annotated the way an actual mark sheet would read.

Candidate instructions: You have 8 minutes. Mrs. Patel, 54, presents with three weeks of upper abdominal discomfort and early satiety. Perform a focused abdominal examination and present your findings to the examiner.
Checklist, in clinical order:
- Wash hands and introduce yourself; confirm patient identity and gain consent.
- Position the patient supine, exposed from nipple to pubis, with appropriate draping.
- Inspect the abdomen for scars, distension, masses, and visible peristalsis.
- Ask about pain location before touching the abdomen.
- Light palpation of all four quadrants, watching the patient's face for guarding.
- Deep palpation to assess organs and masses.
- Palpate specifically for hepatomegaly and splenomegaly using correct technique.
- Percuss for shifting dullness or organomegaly.
- Auscultate bowel sounds for at least 15 seconds.
- Offer to examine hernial orifices and perform a rectal exam (verbalize, do not perform).
- Thank the patient, help with re-dressing, and summarize findings.
Examiner rubric:
| Checklist item | Not done (0) | Partial (1) | Complete (2) | Weight |
|---|---|---|---|---|
| Hand hygiene and consent | Skipped | One step missing | Both done clearly | ×2 (safety) |
| Correct exposure and draping | Skipped | Partial exposure | Fully appropriate | ×1 |
| Systematic palpation sequence | Random order | Mostly ordered | Light then deep, all quadrants | ×2 |
| Organomegaly technique | Not attempted | Attempted, poor technique | Correct technique demonstrated | ×2 |
| Verbal summary to examiner | Not given | Vague summary | Clear, structured summary | ×1 |
A typical pass threshold sits around 60 to 70% of total weighted points, consistent with the three-point scoring model described in the University of Arizona OSCE grading rubric. Weighting safety and technique items at double value reflects how examiners actually score, since a missed handwashing step or an unsafe palpation technique tends to cost more than a skipped verbal flourish at the end.
What Candidate, Patient, and Examiner Scripts Actually Contain
Every real OSCE station runs on three separate scripts, and understanding all three changes how you practice. Academic guidance on OSCE design treats standardized station scripts as the backbone of reliable assessment, because a station only produces fair scores when every candidate faces the same task under the same conditions.
- Candidate instructions state the task, the time limit, and the scope. Example: "You have 8 minutes to take a focused history from this patient presenting with chest pain. You do not need to examine the patient."
- Patient scripts define exactly what the standardized patient portrays, including specific symptoms, vital signs, and emotional affect, so two different examiners see consistent behavior across sittings.
- Examiner checklists list the observable actions being scored, and most prioritize three things above pure technical skill: safety behaviors, communication, and correct sequencing.
Practicing against only the physical exam maneuvers while ignoring the patient script and candidate scope is a common reason students lose points despite knowing the exam cold.
Choosing a Scoring Rubric and Building Printable Checklists
A binary checklist (done or not done) is fast to score but throws away information. A three-point scale, Not Completed, Partially Complete, Complete, captures the difference between a student who forgot a step entirely and one who attempted it with poor technique, which is exactly the distinction the Arizona grading rubric uses.
A simple weighting scheme: safety items (hand hygiene, consent, patient comfort) score double, technique items score standard weight, and communication or closing items score standard weight. A 20-item station might allocate 8 points to five safety items, 8 points to four technique items, and 4 points to remaining steps.
- Keep the printed layout to one page so examiners can scan it in seconds during a live station.
- Leave a blank notes area at the bottom for examiner comments on borderline scores.
- Use a high-contrast, sans-serif font at 11pt or larger. Examiners are scoring in real time, often in dim exam rooms.
Pro Tip: Print your checklist in landscape orientation with checkboxes on the left margin. It is faster to tick boxes down a column than to hunt across a portrait page while watching the clock.
Turning Checklists Into a Practice Routine
A single run-through of a checklist teaches you almost nothing. The value comes from repetition with feedback, ideally spread across weeks rather than crammed into a weekend.
- Build a 30-day rotation. Mix system-focused checklists (respiratory one day, cardiac the next) with full rubric-scored mock stations twice a week, increasing realism as the exam approaches.
- Run peer mocks with defined roles. One student is the candidate, one plays the patient reading from a script, one examiner scores using the rubric, and a timer app calls time at the halfway mark and at one minute remaining.
- Debrief immediately. Walk through the scored checklist item by item while the station is fresh, not after everyone has moved to the next station.
- Track scores across sessions. If your communication score averages 60% across the first week, set a concrete target, like raising it to 75% within two weeks, and revisit that specific checklist category rather than practicing everything at once.
Turning Checklist Practice Into Scored Simulation
Printed checklists get you consistent repetition, but they cap out at whatever your study partner catches. BoardMaster's AI OSCE practice sessions apply the same rubric logic, scoring safety, technique, and communication items automatically after a timed simulation, then logging results so you can see which category is actually improving. One student moved significantly higher on her exam prep percentile ranking while cutting her study time in half using targeted practice. The templates in this guide export directly into a workflow like that.
Communication and Ethics Stations Need Checklists Too
Physical exam stations get most of the attention, but communication and ethics stations follow the same scripted, scored structure, and they trip up students who assume these stations are graded on "vibes" rather than specific observable behaviors.
A breaking bad news checklist typically includes: knock and introduce yourself, confirm the patient's understanding of the situation so far, give a warning shot before the diagnosis, deliver information in plain language without jargon, pause for the patient's reaction, check emotional response before moving forward, and offer a clear next step. Examiners score each of these as discrete items, exactly like a palpation step in an abdominal exam.
An informed consent or capacity assessment station follows a similar pattern: establish rapport, explain the procedure in the patient's own language, check understanding by asking the patient to repeat it back, address the patient's specific concerns, and document that capacity was assessed across all four domains (understanding, retention, weighing, communicating).
A confidentiality or ethical dilemma station (a minor requesting contraception without parental knowledge, for example) scores on whether the candidate identifies the ethical tension out loud, applies the relevant professional guideline, and reaches a defensible position while keeping the patient's autonomy central. Build these into your rotation the same way you would a cardiac station, with one page, numbered steps, a three-point scale, and a peer playing the scripted role.
Adapting Checklists Across Specialties and Difficulty Levels
A checklist built for a straightforward abdominal exam does not automatically work for a surgical clerkship OSCE or an advanced practice exam, and forcing the same template onto every specialty is a common mistake.
For a lower-difficulty station aimed at early clinical years, keep the checklist to core steps only, six to eight items, with generous time (10 to 12 minutes) and a patient script with clear, unambiguous symptoms. For advanced or specialty-specific stations, such as a pediatric developmental assessment or a psychiatric mental state exam, add items that reflect specialty-specific red flags and tighten the time to match real exam conditions (often 7 to 8 minutes).
To adapt a general template, start by asking what a specialty examiner actually penalizes that a general examiner would not. A psychiatry checklist weights risk assessment (suicidal ideation, safety planning) far more heavily than a general medicine checklist would. A pediatrics checklist adds a parent or caregiver communication item that has no equivalent in an adult-only station. Surgical stations often add a consent and surgical safety checklist item that mirrors real operating room protocols.
Raising difficulty for exam-ready practice usually means three changes: cutting the time by 20%, removing verbal cues the patient script would normally give, and requiring the candidate to identify one abnormal finding without being told it exists.
Common Mistakes When Building OSCE Checklists
Poorly designed checklists produce unreliable scores, and the same handful of errors show up across student-made and even some institution-made templates.
Overloading the checklist with too many items. A 30-item checklist for an 8-minute station is unusable in real time. Examiners either rush through it or skip items, which defeats the purpose of having a rubric at all. Cap most stations at 15 to 20 scoreable items.
Vague action verbs. Items like "examines the abdomen appropriately" give an examiner nothing concrete to score against. Compare that to "palpates all four quadrants, light then deep," which is unambiguous and repeatable, the same granularity the Ohio State University checklist uses for its physical exam items.
Treating every item as equal weight. A missed handwashing step and a slightly imprecise percussion technique are not the same severity of error, and a flat checklist that scores them identically produces misleading pass/fail decisions.
No pilot run. Checklists written cold, without a trial run against a real or simulated patient, often miss timing problems until the actual mock exam, when it is too late to fix.
Ignoring the patient script. A checklist built without a matching patient script leaves too much room for inconsistent performances between practice sessions, which undermines the whole point of standardized practice.
Using Checklists for Self-Assessment and Peer Feedback
Self-scoring against a checklist immediately after a real patient encounter, before you forget what happened, builds the same pattern-recognition an examiner develops over years of grading. Sit down within an hour of any clinical encounter and run through your checklist honestly. Mark each item as complete, partial, or missed, and write one sentence explaining any partial or missed score. That sentence is where the actual learning happens, not the checkmark itself.
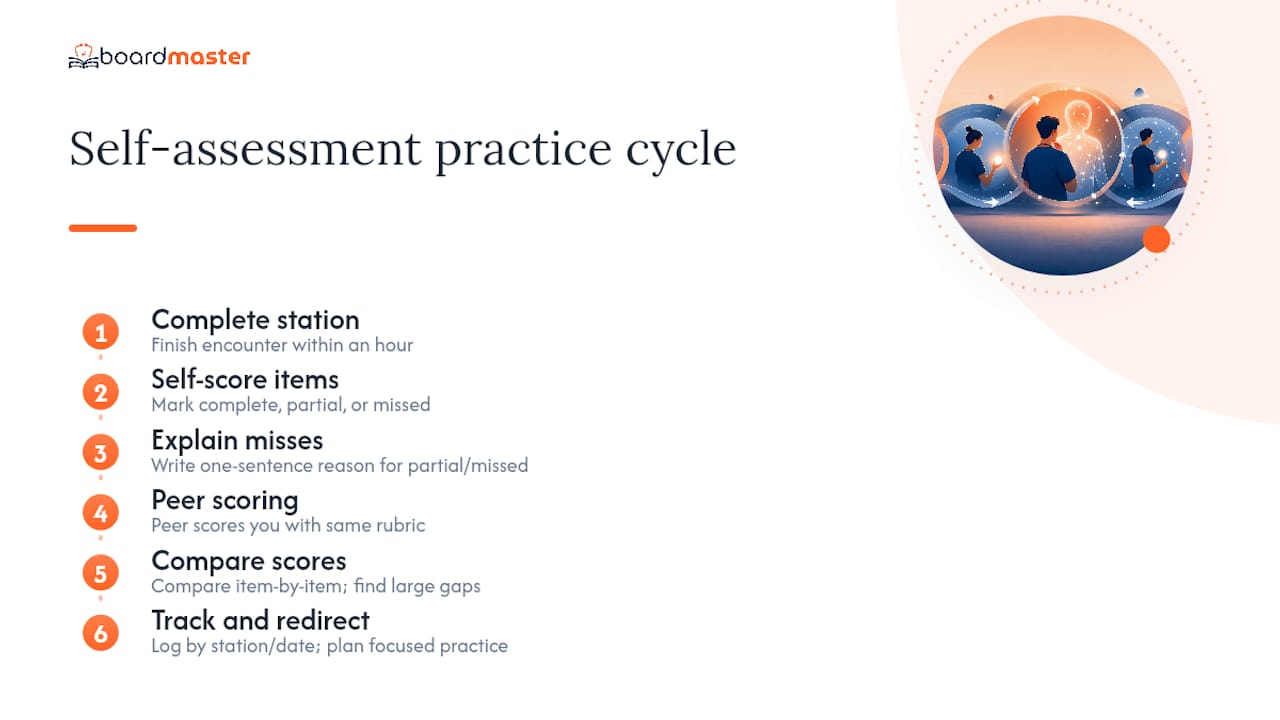
Peer feedback works best with a defined structure rather than an open-ended "how did I do?" conversation. Have your peer score you against the same rubric an examiner would use, then compare your self-score to theirs item by item. Large gaps, especially where you rated yourself higher, usually point to blind spots worth focused practice. Rotate roles every session so you are scoring as often as you are being scored, since watching someone else miss a step sharpens your own checklist recall faster than passive review does.
Track these self-assessment scores the same way you would track a formal mock exam score, in a simple spreadsheet by station type and date. A pattern where your communication scores stay flat while technical scores climb tells you exactly where to redirect the next two weeks of practice.
Digital Tools That Support Checklist-Based Practice
Paper checklists work, but they cap out at whatever a study partner can score by hand. A handful of digital approaches solve specific gaps in the printed workflow.
Basic checklist and form-builder apps let you digitize a paper template so a peer can score on a tablet instead of hunting for a pen, which speeds up multi-station circuit practice. Timer apps with audio cues free up a peer examiner from also having to watch a stopwatch. Shared spreadsheet trackers let a study group log rubric scores across sessions so everyone can see their own trend line over the weeks leading up to the exam.
For scored, examiner-free practice, AI OSCE Practice sessions apply rubric scoring automatically to a timed simulation, which matters most when you are studying alone or your usual peer group is unavailable. The NMC OSCE timing guide breaks down standard station timing structures if you want a scaffold for building your own digital rotation, and structured role-play scenarios give you scripted patient behaviors to feed into whatever tool you use.
The Gap Between Checklist Theory and Exam-Day Performance
Most OSCE prep advice treats checklists as a memorization exercise, a list to recite until it sticks. That misses the actual function of a checklist, which is to force sequencing and prioritization under time pressure, not to test whether you know the steps exist. A student who can recite every step of a cardiac exam from memory but freezes on the order when a real patient is in front of them has not actually prepared.
The conventional advice to "practice until it's automatic" also undersells how much specific, itemized feedback matters. Vague peer feedback, "that was good, maybe work on your exam," produces almost no measurable improvement. Feedback scored against a real rubric, item by item, is what actually moves a score.
If there is one priority for a student starting checklist practice this week, it is this: get a rubric involved from day one, whether that is a peer with a printed mark sheet or a scored AI simulation, rather than practicing loosely and hoping structure emerges on its own. Structure has to be built into the practice from the first repetition, not added later once bad habits are already comfortable.
— Dr. Ahmed Abuzoor
Try Scored OSCE Practice Instead of Guessing Your Readiness
Printed checklists tell you what to do. They do not tell you how you actually performed once the mock is over and your peer's scoring gets generous out of politeness. BoardMaster's AI OSCE practice sessions apply the same three-point rubric logic covered in this guide automatically, scoring safety, technique, and communication items in real time during a timed simulation.

Every session logs your scores by category, so you can see whether your abdominal exam technique is actually improving or just feels more comfortable. You also get exportable station templates you can print for peer-run mocks on days you want a live partner instead of a simulation. Start with the free tier to run a few timed stations, or move to the $39.99 per month plan for unlimited scored practice across every system checklist in this guide.
Where to Find the Original OSCE Checklists and Rubrics
The templates and rubric structures in this guide draw on published academic and university sources you can download directly for full detail.
- The PMC article on OSCE design and deployment covers standardized station scripting and validated marking schemes in full.
- The University of Arizona OSCE Grading Rubric is a printable PDF showing the three-point scoring model and point allocation.
- The Ohio State University physical exam checklist lists granular, itemized physical exam actions used across specialties.
Sources
- OSCE: Design, development and deployment (PMC article)
- OSCE Grading Rubric (University of Arizona, 2019 PDF)
- Physical exam essential checklist for OSCE (Ohio State University PDF)
FAQ
What Is an OSCE Checklist?
An OSCE checklist is an itemized list of observable actions, like handwashing, specific palpation steps, or communication behaviors, that an examiner marks off during a timed clinical skills station. Most modern checklists use a three-point scale rather than a simple yes/no, as outlined in the University of Arizona grading rubric.
What Should I Check on My OSCE Abdominal Exam Checklist?
A complete abdominal checklist covers hand hygiene and consent, correct exposure and positioning, inspection, light and deep palpation of all four quadrants, specific technique for hepatomegaly and splenomegaly, percussion, auscultation of bowel sounds for at least 15 seconds, and a verbal summary to the examiner. The full annotated example above walks through each step in clinical order.
What Are Some Common OSCE Questions or Station Types?
Common station types include focused history taking, a single-system physical exam (respiratory, cardiovascular, abdominal, neurological, or musculoskeletal), communication stations like breaking bad news or obtaining consent, and ethics or professionalism scenarios. Each station type pairs with its own checklist and time limit, typically 8 to 10 minutes.
Does BoardMaster Offer OSCE Practice Tools?
Yes. BoardMaster's AI OSCE Practice feature runs timed clinical simulations with automatic rubric scoring across safety, technique, and communication categories, plus analytics to track improvement over time. Current pricing and plan details are available on the BoardMaster website.